 Here is a straightforward carpentry project with a little country flair. You can install it right over the drywall.
\
Beadboard comes in either planks or sheets but the sheets install much faster than the planks. Many products are tongue-and-groove and fit together seamlessly.
\
The thicker the board, the deeper the grooves. A lot of the inexpensive products are thin, so the decorative grooves of the beadboard are not very deep. When it’s time to paint them, the paint will settle into the grooves and fill them, which detract from the appearance. So, if it’s in your budget, you might consider the better product.
\
Start by determining how high you want the beadboard and snap a chalk line on the wall to mark the height. At this line, install a temporary strip of wood to keep the top of the beadboard aligned. While the top is important, the bottom is not, as it will be covered by the baseboard.
\
Remove the baseboard along the bottom of the wall. Use a putty knife to scrape off any caulking that is sticking to the wall. Regardless of whether you are using the sheets or the planks, make sure the first piece you install is plumb. If your first piece isn’t perfectly vertical, all others will be off as well. You can use a level to check.
\
Beadboard is usually secured to the wall with adhesive and then nailed at the top and bottom. The bottom nails will be hidden by the baseboard and the nails at the top will be hidden by cove molding that you install afterward.
\
Before you start hitting nails into the wall, mark out where the studs are located. You can use small finish nails to tack the board to the wall, as the adhesive will do the brunt of the holding. Apply beads of construction adhesive horizontally to the wall about 16 inches apart and push the board into the adhesive. Make sure the top of the board rests against the underside of the temporary guide strip so that everything is aligned at the end. The next piece of beadboard will have a tongue that slips into the groove of the previous piece.
\
The electrical outlets will be a challenge. You will need to cut a hole in the beadboard to allow the outlet to be accessible.
\
Grab a tube of lipstick or a crayon and draw a line around the outlet. You can dry-fit the panel over the outlet and push the beadboard to the wall. Pull the beadboard off and on the back of the board will be the outline of the outlet. Use this as a guide to cut the opening large enough to allow access to the box.
\
Words of caution: Turn the power off to the outlet when you are working on it. You will have to remove the cover plate, install a box extender, and then reinstall the cover plate after the board has been secured to the wall. You must also negotiate the corners. As you approach the corner, just cut it to end flush at the corner. Coming out of the corner, you can butt the end of the board against the other corner piece. You may have to cut the piece coming out of the corner so that the beads maintain the same amount of spacing.
\
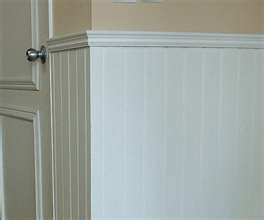
Once the beadboard is installed, reinstall the baseboard and then look to the top of the beadboard. Install a piece of bullnose along the top of the board so that it stands proud like a tiny shelf. Under this shelf, install a piece of cove molding. This will not only hide the finish nails, but will also dress up the installation. Maybe then you can slip on an apron and start cookin’ some country fixins’.
\
